Wednesday, September 29, 2010

Beef and Butternut Squash Chili


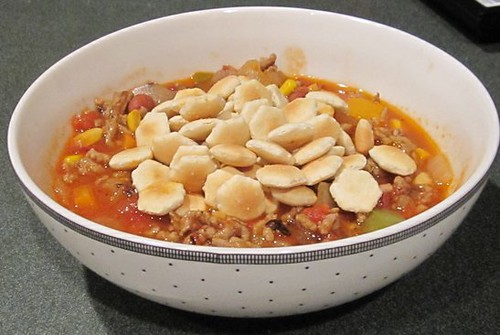
(Beef and Butternut Squash Chili - Best served with oyster crackers)

I know I've said it a few times already, but Fall is my most favorite time of year. I just love all of the scents, flavors, and activities! One of the best things about Fall is the food! Not only is the food good, it is typically well suited for freezing, which will end up saving you time.

The next 7 days are going to be very busy for me. I have a CPA exam next Wednesday and I'm in serious study mode now. That means that ALL of my "free" time will be devoted to studying. (Well, except for Thursday night when Grey's and Private Practice are on!). So in order to save myself some time and hassle, I made this wonderful chili for dinner. I portioned out enough so I can eat it all week long and froze the remaining chili in individual servings. This is perfect weather for chili! Oh and this chili is actually pretty healthy. I've included the nutritional information at the end of the post!

Beef and Butternut Squash Chili
(Prep Time: 20 minutes, Cook Time: 50 minutes, Yield: 8, 1 cup servings)*
1 pound extra-lean ground beef (I used 85/15)
1 green bell pepper, chopped
1 medium onion, chopped
1-2 Serrano peppers**
2 cloves garlic, minced
2 (14.5 oz) cans of Mexican-style stewed tomatoes, chopped***
1 (16 oz) can of chili beans
1/2 small butternut squash, peeled and cubed (about 1 1/2 cups)
1 cup fat free, reduced sodium beef broth
1 1/2 tsp ground cumin
1 1/2 tsp chili powder
1 cup frozen corn kernels

*Okay, I don't know about the rest of you, but I never make food as quickly as a recipe states. It took me awhile to get all the veges chopped, especially the squash! Depending on your chopping skills, I'd add 10-20 more minutes to the prep time.
**I love spicy food, so I added the Serrano peppers to give it a little kick
***For the sake of time and ease, I used 2 cans of rotel

Cook beef, bell pepper, onion, Serrano peppers and garlic in a Dutch oven (or large saucepan) over medium-high heat, until beef crumbles and is no longer pink. Drain well and return to Dutch oven.

Stir in tomatoes, beans, squash, beef broth, cumin, and chili powder and bring to a boil over medium-high heat. Cover, reduce heat to medium-low, and simmer, stirring occasionally, for 15 minutes. Stir in corn and cook uncovered for 15 minutes, or until squash is tender and chili has thickened.

Nutritional Information:
234 Calories (22% from fat)
6g Fat (sat. 2.3g, mono. 2.3g, poly. 0.4g)
2.9mg Iron
21mg Cholesterol
65mg Calcium
30g Carbohydrates
642mg Sodium
17g Protein
6.8g Fiber

Source: Adapted from MyRecipes.com

I hope you enjoy this chili as much as I did!

Sincerely,
Bailey

Saturday, September 25, 2010

Phishin' in Chicago

Ahh, time has escaped me! I cannot believe it's been over a week since my last post. I've been super busy with work and studying for the almighty CPA exam. Studying consumes the majority of my time these days. Anyway, I wanted to post about some of my vacations that I took earlier this summer!

First we'll start with Chicago! I'll post about the other major summer vacation later.

My boyfriend, Ryan, LOVES Phish (I'm a pretty big fan too). The main reason for our trip to Chicago was the Phish concert. It was the kick-off show of their summer tour. And it was A-M-A-Z-I-N-G! The concert was on June 11 at Toyota Park. Here's a few pictures from the show:

Ryan and I out in the lot before the show

Me in front of the stage, waiting for the show to start


 Ryan and I sitting near the stage before the show


 Phish at the beginning of the show


After dark


Since we were going to be there already, we decided to stay a couple extra days and explore the city. We stayed at a fantastic hotel, Hotel Allegro, right in the heart of downtown Chicago. We were walking distance from the "L" which made our travel around the city very easy.

The day after the concert we pretty much just wandered the streets of down town Chicago. We ended up walking quite a few more blocks than intended, so we just HAD to stop for some yummy cheesecake in order to re-energize ourselves! After the mid-afternoon snack, sight-seeing and window shopping, we walked a few more blocks to an awesome steakhouse called 437 Rush where we had dinner reservations. I got such a terrific deal for this steakhouse from Groupon. For those of you who don't know about Groupon, I HIGHLY suggest the site. After dinner we walked down to the Chicago Riverfront. I made Ryan pose for a few pics :) He was very cooperative! Here's some pictures from that day:

Our hotel


Ready for a day on the town


Can we say, DELISH?


Ryan in front of the restaurant


Posing in front of the Chicago River


The next day we went to the Chicago Ribfest until it started to rain. Luckily the rain didn't last long! Once the rain let up, we decided to head to the zoo. It was pretty crowded. And honestly, I was expecting a little more since Chicago is such a big town. Still, the zoo was cool! After the zoo we took the L down to Millennium Park. We saw the "Bean" and the outdoor theater. While exploring the park we heard some music in the distance. As we walked toward the sound we discovered there was a blues festival going on. It was such a great night and the city painted such a beautiful backdrop for the outdoor concert!

The crowd at Ribfest

Official "Wash Fest" at Ribfest

At the Lincoln Park Zoo


Monkey at the zoo. That looks... comfortable?


New species?


The "Bean"


Ryan and I "in the Bean"

  
Millennium Park Theater


Chicago Blues Festival 2010


View of the stage with the skyline in the background


On our last day in Chicago we decided to go to the history museum before catching our flight. It was "free admission" day so that saved us some money. Unfortunately, it seemed like half the city showed up for the free admission, so it was VERY packed! Oh, and don't you think the fog makes this picture look awesome?


I forgot to mention, when we arrived in Chicago it was shortly after the Chicago Black Hawks won the Stanley Cup. As we arrived to the hotel the streets were packed with people. Apparently the town had just finished a celebratory parade in honor of the win. Well, it appeared that everyone in Chicago was excited about this victory, even this "lady" at the museum of natural history.


This vacation was so much fun! It definitely marked the beginning of a spectacular summer! Stay tuned for my Colorado vacation!

Sincerely,
Bailey

Tuesday, September 14, 2010

About Page

Hey everyone! I've finally finished my "About" page. Sorry it's taken so long to get it posted but I've been running low on time lately!

Anyway, swing on over and take a look sometime! You'll get some insight on the purpose of the blog and a little background on me!

Sincerely,
Bailey

Saturday, September 11, 2010

Honey Walnut Bagel Spread

I don't know about the rest of you, but I have a major weakness for cream cheese spreads. Specifically Panera's honey walnut cream cheese spread. This can be a pretty expensive (and fattening) weakness. I've been playing around with different ingredient combinations and have finally succeeded in concocting the BEST homemade version of honey walnut cream cheese. This batch will last about a week (depending on how much you use at a time), it's probably healthier than the Panera version, and it is cheaper overall. Plus, many of the necessary ingredients are staples in most pantries. I hope you enjoy! And feel free to alter the ingredients to fit your personal tastes.

Reduced Fat Honey Walnut Cream Cheese Spread
8oz Reduced fat (or fat free) cream cheese
2 tsp Vanilla
3 tbsp Honey
3 tbsp Brown Sugar
1/2 cup Toasted Walnuts
Dash of Cinnamon (optional)
Dash of Nutmeg (optional)

There are numerous methods for toasting walnuts, such as baking, microwaving, and stove-top. I typically use the stove-top method because it is quick and easy.

Heat walnuts in a dry skillet over medium heat for 3 to 5 minutes or until they're golden brown and they give off a rich, toasty fragrance. Watch them closely when using this method as it's easy to burn them.

Using a hand mixer, combine cream cheese, honey and vanilla. After the mixture is smooth and well incorporated, stir in the brown sugar. Once the walnuts have cooled, add them to the mixture.


I love to use this mixture with double fiber english muffins!

Inspired by: Panera's Honey Walnut Cream Cheese

 
Sincerely,
Bailey

Wednesday, September 8, 2010

Labor Day Weekend

Well this past weekend just flew by! Labor day marks the "unofficial" end of summer, and the beginning of my favorite season of all - Fall!! Plus, now with my "big girl job", I get paid time off to celebrate!

I decided to take advantage of my extended vacation from work and go "home" to visit my family. Now, I only live an hour away from my family, but it seems like I only make it back every few months. This is probably because my schedule is so busy! All I normally feel like doing on the weekends is relaxing at home.

Because it had been awhile since I'd been back to visit, I decided I'd bake some cookies to share once I got there. I had a very difficult time figuring out which cookies to make, so I settled on making peanut butter cookies AND chocolate chip cookies! They were a BIG hit! I'm so glad I left a few of each kind at my apartment! Between my family, my boyfriend's family, and a barbecue, almost 40 cookies were consumed!

So Friday evening I put in "Sex and the City (the movie)" and got to baking! It took me the entire length of the movie to bake all the cookies. It was a nice, relaxing evening!

Chocolate Chip Cookies
2 cups plus 2 tbsp. all-purpose flour
½ tsp. baking soda
½ tsp. salt
12 tbsp. unsalted butter, melted and cooled until warm
1 cup brown sugar, packed
½ cup granulated sugar
1 large egg plus 1 egg yolk
2 tsp. vanilla extract
1 ½ cups semi-sweet chocolate chips

Depending on size, this recipe will yield approximately 25 cookies

Adjust oven racks to upper and lower-middle positions. Preheat oven 325°. Line two cookie sheets with parchment paper.

In a medium mixing bowl, whisk together the dry ingredients (flour, baking soda, and salt) and set aside. In a separate bowl, mix together the butter and sugars until thoroughly combined (by hand or with use of electric mixer). Next, beat in egg, yolk, and vanilla until combined. Add dry ingredients and beat at low-speed just until combined. Stir in chocolate chips.

Roll a scant half-cup of dough into a ball. Holding dough ball in fingertips of both hands, pull apart into two equal halves. Place the formed dough balls onto the cookie sheet, with jagged surfaces facing up. Make sure to leave ample room between each ball, as the cookies will spread during baking. Bake, reversing position of cookie sheets halfway through baking, until cookies are light golden brown and outer edges start to harden yet centers are still soft and puffy (approximately 11-14 minutes).
Cool cookies on sheets until able to lift without breaking. Transfer to a wire rack to cool. Store in an airtight container.


Chewy Peanut Butter Cookies
3 cups all-purpose flour
1 cup sugar
1½ tsp. baking soda
1 tsp. baking powder
½ tsp. salt
¼ cup vegetable shortening
4 tbsp. unsalted butter, at room temperature
1 cup creamy peanut butter
1 cup honey
2 large eggs
Sugar, for rolling the cookies

Depending on size, this recipe will yield approximately 30 cookies

Adjust oven racks to upper and lower-middle positions. Preheat oven 350°. Line two cookie sheets with parchment paper.

In a medium mixing bowl, whisk together the dry ingredients (flour, sugar, baking soda, baking powder and salt) and set aside. In a separate bowl, cream together the shortening, butter, peanut butter and honey. Mix in the eggs one at a time, beating well after each addition. With the mixer on low speed, add the dry ingredients to the peanut butter mixture and beat just until incorporated.

Note: I used a hand mixer, but a stand mixer (with paddle attachment) would probably be more appropriate. I started to have some difficulty because the dough was so thick.

Roll the dough into 1½-inch balls, and roll each dough ball in sugar. Place the dough balls on the prepared cookie sheet, a couple inches apart. Bake for 10-12 minutes, or until slightly puffed and golden. Since I baked two sheets at a time, I reversed the position of each cookie sheet half way through the cooking time. Remove from the oven and let cool on the baking sheet for 5-10 minutes before transferring to a wire cooling rack to cool completely. Repeat with the remaining dough. Store in an airtight container.


Source: adapted from Annie's Eats (Chewy Peanut Butter Cookies and Thick & Chewy Chocolate Chip Cookies)

Sincerely,
Bailey

Wednesday, September 1, 2010

My First Paper Project

I began playing with the idea of scrapbooking early this summer. It all started when I stumbled across this wedding blog (Road to the Aisle). The writer, a woman named Heather, is a very crafty young lady! She totally inspired my creative side. Now, most of her posts are related to DIY projects for weddings (which, by the way, I plan to try when the time comes). But she also includes many "how-to" guides for making all sorts of neat paper crafts and other projects. So I decided, hey, maybe I can do this too. How gratifying would it be to create something by hand? And if only they could turn out as beautifully as some of her projects!

My mind was made up. I was going to jump right in to this! I had a friend who was expecting her first child any day, so I decided I'd make a card for her. I went to Michael's and bought the scrapbooking basics: a paper cutter, adhesives, paper, a craft knife and some decorations.

It took quite some time to get everything right. And let me tell you, cutting out tiny letters with a craft knife for the very first time was quite the awakening! It takes A LOT of patience and a steady hand. Although it looked a little sloppy, I was SO proud of myself. I consider my first attempt at paper crafting to be an overall success. It gave me further encouragement to continue with this whole paper crafts/scrapbooking thing!

Here's a picture of the card I made:

While I am getting better at using a craft knife, I am considering a future purchase of a Cricut or maybe a Silhouette. Having one of these would make lettering/shape cutting SO much easier. They're both pretty expensive though, so I want to make sure I'm in this for the long haul before I invest too much money. I'm leaning toward the Silhouette, mainly because it doesn't require cartridges like the Cricut. Therefore it is more of an upfront cost, rather than an on-going cost. If you have either of these, please give me some feedback!! I'd like to know which you prefer and why, and whether you think it's worth the price!


Sincerely,
Bailey

My First Scrapbooking Classes

Well I officially signed up for my first scrapbooking classes. Since I am still pretty new to the scrapbooking world, I decided it would be helpful to learn some "tricks of the trade".

There's this little shop called The Scrapbook Page that I drive past every single day. I've noticed that the parking lot is almost always full and this caught my interest. So far I have been going to Michael's for my scrapbooking needs, but I'm thinking this may be my new go-to place for supplies. In fact, I think I might go check it out this weekend!

Once I take my classes, I'll let you know how it went. In the meantime, feel free to check out their website! They offer all kinds of supplies to buy online or in store, and offer tons of different classes ranging from scrapbook techniques, to photo techniques, to product demos. The classes I signed up for are about photo techniques. Also, from my brief phone interaction with the staff, they seem to have excellent customer service! I can't wait!

Sincerely,
Bailey