
Hello Blog World!
I know I have been pretty terrible at updating my blog lately. The combination of working (out of town, nonetheless) and studying for my next exam has left me with approximately 5 minutes of free time each day. I promise I will be back in action beginning the week of Thanksgiving! I have many posts planned and will have much more free time to crank them out! Love you all!
Sincerely,
Bailey
Monday, November 15, 2010
Tuesday, November 2, 2010
Spicy Broccoli Pasta
Hey There!
As you probably know I've been working out of town the past couple weeks. Well I have training today in my office so I came back last night to save myself an early morning commute. Since I've been gone so much lately I have hardly any food at my apartment. So for dinner last night, I had to improvise.
I looked in the pantry and fridge and saw that I had some pasta, some frozen broccoli and some parmesan cheese and though oooh! I know what I can make! Awhile back I saw a recipe for spicy broccoli pasta and decided to try it out. It's a simple recipe and doesn't take very long to cook! I love spicy food, so I added some red pepper flakes, however, you can adjust the spice level to your tastes!
Spicy Broccoli Pasta
1 lb. broccoli (preferrably fresh, but frozen will work if you're in a pinch)
½ cup extra virgin olive oil
4 cloves garlic, minced
½ tsp. crushed red pepper flakes
1 lb. pasta, cooked
Hot Sauce, to taste - a few drops (My Favorite is Sriracha)
Parmesan for sprinkling on top
Cook broccoli in boiling water, 3-5 minutes until just tender**. Heat oil in skillet over medium heat. Add garlic. Cook over medium heat until just golden, about 2 minutes. Add drained broccoli and red pepper flakes, and cook 5 minutes. Add salt and pepper to taste. Add hot sauce to cooked pasta. Toss and serve.
**If you're using frozen broccoli, skip this step. Just warm it up and toss it in the pan and saute with the garlic.

(Ignore my messy stovetop!!)
And here's the finished product!

Source: Adapted from Annie's Eats
So fast and so easy! It was ready in about 15 minutes and tastes yummy! It did make quite a bit, but you can store for a couple days in the fridge.
I hope you enjoy!!
Sincerely,
Bailey
As you probably know I've been working out of town the past couple weeks. Well I have training today in my office so I came back last night to save myself an early morning commute. Since I've been gone so much lately I have hardly any food at my apartment. So for dinner last night, I had to improvise.
I looked in the pantry and fridge and saw that I had some pasta, some frozen broccoli and some parmesan cheese and though oooh! I know what I can make! Awhile back I saw a recipe for spicy broccoli pasta and decided to try it out. It's a simple recipe and doesn't take very long to cook! I love spicy food, so I added some red pepper flakes, however, you can adjust the spice level to your tastes!
Spicy Broccoli Pasta
1 lb. broccoli (preferrably fresh, but frozen will work if you're in a pinch)
½ cup extra virgin olive oil
4 cloves garlic, minced
½ tsp. crushed red pepper flakes
1 lb. pasta, cooked
Hot Sauce, to taste - a few drops (My Favorite is Sriracha)
Parmesan for sprinkling on top
Cook broccoli in boiling water, 3-5 minutes until just tender**. Heat oil in skillet over medium heat. Add garlic. Cook over medium heat until just golden, about 2 minutes. Add drained broccoli and red pepper flakes, and cook 5 minutes. Add salt and pepper to taste. Add hot sauce to cooked pasta. Toss and serve.
**If you're using frozen broccoli, skip this step. Just warm it up and toss it in the pan and saute with the garlic.
(Ignore my messy stovetop!!)
And here's the finished product!
Source: Adapted from Annie's Eats
So fast and so easy! It was ready in about 15 minutes and tastes yummy! It did make quite a bit, but you can store for a couple days in the fridge.
I hope you enjoy!!
Sincerely,
Bailey
Sunday, October 24, 2010
Ohhh my!! It's time for Pumpkin Pie!
After traveling the past couple weeks, it's so nice to be able to spend the weekend at home. Today has been very relaxing. I slept in MUCH later than normal and then just lounged around for awhile. After spending some time out on the deck admiring the scenery and cool Fall air, I decided that I MUST bake a pumpkin pie. There was no getting around it!
I have to say that pumpkin pie is probably one of my most favorite pies! The combination of cinnamon, cloves and ginger is amazing! And of course, the pumpkin! I could eat pumpkin most days if given the opportunity! It's so versatile. I try to limit myself to pumpkin during fall only. That way it seems more like a treat and indulgence. I don't get tired of it that way!
So I spent this evening baking my first pumpkin pie of the season. The recipe I used is the classic pumpkin pie recipe from the back of the Libby's pumpkin can. It's so wonderful, I just don't see a reason to alter it. The pie turned out beautifully!!

Classic Pumpkin Pie
3/4 cup granulated sugar
Pour mixture into pie shell.
Bake in preheated 425° F oven for 15 minutes. Reduce temperature to 350° F; bake for 40 to 50 minutes or until knife inserted near center comes out clean. Cool on wire rack for 2 hours. Serve immediately or refrigerate. Top with whipped cream before serving.
Source: Libby's
Stay tuned for my attempt at homemade pumpkin spice latte!
Enjoy!
Sincerely,
Bailey
I have to say that pumpkin pie is probably one of my most favorite pies! The combination of cinnamon, cloves and ginger is amazing! And of course, the pumpkin! I could eat pumpkin most days if given the opportunity! It's so versatile. I try to limit myself to pumpkin during fall only. That way it seems more like a treat and indulgence. I don't get tired of it that way!
So I spent this evening baking my first pumpkin pie of the season. The recipe I used is the classic pumpkin pie recipe from the back of the Libby's pumpkin can. It's so wonderful, I just don't see a reason to alter it. The pie turned out beautifully!!
Classic Pumpkin Pie
3/4 cup granulated sugar
1 teaspoon ground cinnamon
1/2 teaspoon salt
1/2 teaspoon ground ginger
1/4 teaspoon ground cloves
2 large eggs
1 can (15 oz.) Pumpkin
1 can (12 fl. oz.) Evaporated Milk
1 unbaked 9-inch (4-cup volume) deep-dish pie shell
Whipped cream (optional)
Combine sugar, cinnamon, salt, ginger and cloves in small bowl. In a separate large bowl, beat the eggs. Stir in pumpkin and sugar-spice mixture into the large bowl. Gradually stir in evaporated milk.
Combine sugar, cinnamon, salt, ginger and cloves in small bowl. In a separate large bowl, beat the eggs. Stir in pumpkin and sugar-spice mixture into the large bowl. Gradually stir in evaporated milk.
Pour mixture into pie shell.
Bake in preheated 425° F oven for 15 minutes. Reduce temperature to 350° F; bake for 40 to 50 minutes or until knife inserted near center comes out clean. Cool on wire rack for 2 hours. Serve immediately or refrigerate. Top with whipped cream before serving.
Source: Libby's
Stay tuned for my attempt at homemade pumpkin spice latte!
Enjoy!
Sincerely,
Bailey
Thursday, October 21, 2010
Branson Vacation
Whew! These past few week have been a whirlwind of activity! My family took our yearly trip to Branson a couple weeks ago. We couldn't have asked for better weather! It was a perfect 80 degrees the entire weekend, with just a slight breeze and ample sun! I wish I would have gotten more pictures! Both my sister and I brought our boyfriends with us this time, which is the first time any of us brought a non-family member along. It went pretty smoothly though.
We did all the traditional things we do in Branson: visit the fish hatchery, go to the ice cream shop up in the mountains, go to old downtown, and of course, shopping at the outlet malls. In the evenings we just hung outside on the deck talking and having a good ol' time! We played a few rounds of nark nark, which is pretty much team solitaire on speed, and a few games of dominoes!
It was my first time playing "real" dominoes. I played against the boys (aka - my boyfriend and my brother) and I beat both of them (by A LOT)! They called it beginner's luck, but I called it the obvious result of playing a numbers game with an accountant :)
It is so nice to have these family traditions. I can't wait to someday take my own children there! It's funny how just a few years ago I *hated* going to some of those attractions. It was just brutal going to the fish hatchery, and utterly annoying going down to the waterfront. But now I can see that I was just a moody teenager with an attitude! I know you're thinking "You with an attitude - not a chance!" HAHA But it's true. Oh how the tables turn when you start to "grow up"!
I planned to post pictures of the trip, but I've been traveling for work ever since I got back from Branson. AND I forgot to bring the right cord with me to upload photos. So I will post the Branson photos this weekend when I get back home!
I have some exciting posts coming up. Well, I'm excited about them at least! Hopefully you will enjoy. Stayed tuned! Oh and I PROMISE I won't wait so long to post! Like I said, it's been a crazy few weeks!
Sincerely,
Bailey
Wednesday, September 29, 2010
Beef and Butternut Squash Chili

(Beef and Butternut Squash Chili - Best served with oyster crackers)
I know I've said it a few times already, but Fall is my most favorite time of year. I just love all of the scents, flavors, and activities! One of the best things about Fall is the food! Not only is the food good, it is typically well suited for freezing, which will end up saving you time.
The next 7 days are going to be very busy for me. I have a CPA exam next Wednesday and I'm in serious study mode now. That means that ALL of my "free" time will be devoted to studying. (Well, except for Thursday night when Grey's and Private Practice are on!). So in order to save myself some time and hassle, I made this wonderful chili for dinner. I portioned out enough so I can eat it all week long and froze the remaining chili in individual servings. This is perfect weather for chili! Oh and this chili is actually pretty healthy. I've included the nutritional information at the end of the post!
Beef and Butternut Squash Chili
(Prep Time: 20 minutes, Cook Time: 50 minutes, Yield: 8, 1 cup servings)*
1 pound extra-lean ground beef (I used 85/15)
1 green bell pepper, chopped
1 medium onion, chopped
1-2 Serrano peppers**
2 cloves garlic, minced
2 (14.5 oz) cans of Mexican-style stewed tomatoes, chopped***
1 (16 oz) can of chili beans
1/2 small butternut squash, peeled and cubed (about 1 1/2 cups)
1 cup fat free, reduced sodium beef broth
1 1/2 tsp ground cumin
1 1/2 tsp chili powder
1 cup frozen corn kernels
*Okay, I don't know about the rest of you, but I never make food as quickly as a recipe states. It took me awhile to get all the veges chopped, especially the squash! Depending on your chopping skills, I'd add 10-20 more minutes to the prep time.
**I love spicy food, so I added the Serrano peppers to give it a little kick
***For the sake of time and ease, I used 2 cans of rotel
Cook beef, bell pepper, onion, Serrano peppers and garlic in a Dutch oven (or large saucepan) over medium-high heat, until beef crumbles and is no longer pink. Drain well and return to Dutch oven.
Stir in tomatoes, beans, squash, beef broth, cumin, and chili powder and bring to a boil over medium-high heat. Cover, reduce heat to medium-low, and simmer, stirring occasionally, for 15 minutes. Stir in corn and cook uncovered for 15 minutes, or until squash is tender and chili has thickened.
Nutritional Information:
234 Calories (22% from fat)
6g Fat (sat. 2.3g, mono. 2.3g, poly. 0.4g)
2.9mg Iron
21mg Cholesterol
65mg Calcium
30g Carbohydrates
642mg Sodium
17g Protein
6.8g Fiber
Source: Adapted from MyRecipes.com
I hope you enjoy this chili as much as I did!
Sincerely,
Bailey
Saturday, September 25, 2010
Phishin' in Chicago
Ahh, time has escaped me! I cannot believe it's been over a week since my last post. I've been super busy with work and studying for the almighty CPA exam. Studying consumes the majority of my time these days. Anyway, I wanted to post about some of my vacations that I took earlier this summer!
First we'll start with Chicago! I'll post about the other major summer vacation later.
My boyfriend, Ryan, LOVES Phish (I'm a pretty big fan too). The main reason for our trip to Chicago was the Phish concert. It was the kick-off show of their summer tour. And it was A-M-A-Z-I-N-G! The concert was on June 11 at Toyota Park. Here's a few pictures from the show:
Ryan and I out in the lot before the show
Me in front of the stage, waiting for the show to start

Ryan and I sitting near the stage before the show

Phish at the beginning of the show

After dark

Since we were going to be there already, we decided to stay a couple extra days and explore the city. We stayed at a fantastic hotel, Hotel Allegro, right in the heart of downtown Chicago. We were walking distance from the "L" which made our travel around the city very easy.
The day after the concert we pretty much just wandered the streets of down town Chicago. We ended up walking quite a few more blocks than intended, so we just HAD to stop for some yummy cheesecake in order to re-energize ourselves! After the mid-afternoon snack, sight-seeing and window shopping, we walked a few more blocks to an awesome steakhouse called 437 Rush where we had dinner reservations. I got such a terrific deal for this steakhouse from Groupon. For those of you who don't know about Groupon, I HIGHLY suggest the site. After dinner we walked down to the Chicago Riverfront. I made Ryan pose for a few pics :) He was very cooperative! Here's some pictures from that day:
Our hotel

Ready for a day on the town

Can we say, DELISH?

Ryan in front of the restaurant


The crowd at Ribfest


At the Lincoln Park Zoo

Monkey at the zoo. That looks... comfortable?

New species?

The "Bean"

Ryan and I "in the Bean"

Millennium Park Theater

Chicago Blues Festival 2010

View of the stage with the skyline in the background

On our last day in Chicago we decided to go to the history museum before catching our flight. It was "free admission" day so that saved us some money. Unfortunately, it seemed like half the city showed up for the free admission, so it was VERY packed! Oh, and don't you think the fog makes this picture look awesome?

I forgot to mention, when we arrived in Chicago it was shortly after the Chicago Black Hawks won the Stanley Cup. As we arrived to the hotel the streets were packed with people. Apparently the town had just finished a celebratory parade in honor of the win. Well, it appeared that everyone in Chicago was excited about this victory, even this "lady" at the museum of natural history.

This vacation was so much fun! It definitely marked the beginning of a spectacular summer! Stay tuned for my Colorado vacation!
Sincerely,
Bailey
First we'll start with Chicago! I'll post about the other major summer vacation later.
My boyfriend, Ryan, LOVES Phish (I'm a pretty big fan too). The main reason for our trip to Chicago was the Phish concert. It was the kick-off show of their summer tour. And it was A-M-A-Z-I-N-G! The concert was on June 11 at Toyota Park. Here's a few pictures from the show:
Ryan and I out in the lot before the show
Me in front of the stage, waiting for the show to start
Ryan and I sitting near the stage before the show
Phish at the beginning of the show
After dark
Since we were going to be there already, we decided to stay a couple extra days and explore the city. We stayed at a fantastic hotel, Hotel Allegro, right in the heart of downtown Chicago. We were walking distance from the "L" which made our travel around the city very easy.
The day after the concert we pretty much just wandered the streets of down town Chicago. We ended up walking quite a few more blocks than intended, so we just HAD to stop for some yummy cheesecake in order to re-energize ourselves! After the mid-afternoon snack, sight-seeing and window shopping, we walked a few more blocks to an awesome steakhouse called 437 Rush where we had dinner reservations. I got such a terrific deal for this steakhouse from Groupon. For those of you who don't know about Groupon, I HIGHLY suggest the site. After dinner we walked down to the Chicago Riverfront. I made Ryan pose for a few pics :) He was very cooperative! Here's some pictures from that day:
Our hotel
Ready for a day on the town
Can we say, DELISH?
Ryan in front of the restaurant
Posing in front of the Chicago River
The next day we went to the Chicago Ribfest until it started to rain. Luckily the rain didn't last long! Once the rain let up, we decided to head to the zoo. It was pretty crowded. And honestly, I was expecting a little more since Chicago is such a big town. Still, the zoo was cool! After the zoo we took the L down to Millennium Park. We saw the "Bean" and the outdoor theater. While exploring the park we heard some music in the distance. As we walked toward the sound we discovered there was a blues festival going on. It was such a great night and the city painted such a beautiful backdrop for the outdoor concert!
The crowd at Ribfest
Official "Wash Fest" at Ribfest
At the Lincoln Park Zoo
Monkey at the zoo. That looks... comfortable?
New species?
The "Bean"
Ryan and I "in the Bean"
Millennium Park Theater
Chicago Blues Festival 2010
View of the stage with the skyline in the background
On our last day in Chicago we decided to go to the history museum before catching our flight. It was "free admission" day so that saved us some money. Unfortunately, it seemed like half the city showed up for the free admission, so it was VERY packed! Oh, and don't you think the fog makes this picture look awesome?
I forgot to mention, when we arrived in Chicago it was shortly after the Chicago Black Hawks won the Stanley Cup. As we arrived to the hotel the streets were packed with people. Apparently the town had just finished a celebratory parade in honor of the win. Well, it appeared that everyone in Chicago was excited about this victory, even this "lady" at the museum of natural history.
This vacation was so much fun! It definitely marked the beginning of a spectacular summer! Stay tuned for my Colorado vacation!
Sincerely,
Bailey
Tuesday, September 14, 2010
About Page
Hey everyone! I've finally finished my "About" page. Sorry it's taken so long to get it posted but I've been running low on time lately!
Anyway, swing on over and take a look sometime! You'll get some insight on the purpose of the blog and a little background on me!
Sincerely,
Bailey
Anyway, swing on over and take a look sometime! You'll get some insight on the purpose of the blog and a little background on me!
Sincerely,
Bailey
Saturday, September 11, 2010
Honey Walnut Bagel Spread
I don't know about the rest of you, but I have a major weakness for cream cheese spreads. Specifically Panera's honey walnut cream cheese spread. This can be a pretty expensive (and fattening) weakness. I've been playing around with different ingredient combinations and have finally succeeded in concocting the BEST homemade version of honey walnut cream cheese. This batch will last about a week (depending on how much you use at a time), it's probably healthier than the Panera version, and it is cheaper overall. Plus, many of the necessary ingredients are staples in most pantries. I hope you enjoy! And feel free to alter the ingredients to fit your personal tastes.
Reduced Fat Honey Walnut Cream Cheese Spread


Inspired by: Panera's Honey Walnut Cream Cheese
Sincerely,
Bailey
Reduced Fat Honey Walnut Cream Cheese Spread
8oz Reduced fat (or fat free) cream cheese
2 tsp Vanilla
3 tbsp Honey
3 tbsp Brown Sugar
1/2 cup Toasted Walnuts
Dash of Cinnamon (optional)
Dash of Nutmeg (optional)
There are numerous methods for toasting walnuts, such as baking, microwaving, and stove-top. I typically use the stove-top method because it is quick and easy.
Heat walnuts in a dry skillet over medium heat for 3 to 5 minutes or until they're golden brown and they give off a rich, toasty fragrance. Watch them closely when using this method as it's easy to burn them.
Using a hand mixer, combine cream cheese, honey and vanilla. After the mixture is smooth and well incorporated, stir in the brown sugar. Once the walnuts have cooled, add them to the mixture.

I love to use this mixture with double fiber english muffins!
Inspired by: Panera's Honey Walnut Cream Cheese
Sincerely,
Bailey
Wednesday, September 8, 2010
Labor Day Weekend
Well this past weekend just flew by! Labor day marks the "unofficial" end of summer, and the beginning of my favorite season of all - Fall!! Plus, now with my "big girl job", I get paid time off to celebrate!
I decided to take advantage of my extended vacation from work and go "home" to visit my family. Now, I only live an hour away from my family, but it seems like I only make it back every few months. This is probably because my schedule is so busy! All I normally feel like doing on the weekends is relaxing at home.
Because it had been awhile since I'd been back to visit, I decided I'd bake some cookies to share once I got there. I had a very difficult time figuring out which cookies to make, so I settled on making peanut butter cookies AND chocolate chip cookies! They were a BIG hit! I'm so glad I left a few of each kind at my apartment! Between my family, my boyfriend's family, and a barbecue, almost 40 cookies were consumed!
So Friday evening I put in "Sex and the City (the movie)" and got to baking! It took me the entire length of the movie to bake all the cookies. It was a nice, relaxing evening!
Chocolate Chip Cookies
2 cups plus 2 tbsp. all-purpose flour
½ tsp. baking soda
½ tsp. salt
12 tbsp. unsalted butter, melted and cooled until warm
1 cup brown sugar, packed
½ cup granulated sugar
1 large egg plus 1 egg yolk
2 tsp. vanilla extract
1 ½ cups semi-sweet chocolate chips
Depending on size, this recipe will yield approximately 25 cookies
Adjust oven racks to upper and lower-middle positions. Preheat oven 325°. Line two cookie sheets with parchment paper.
In a medium mixing bowl, whisk together the dry ingredients (flour, baking soda, and salt) and set aside. In a separate bowl, mix together the butter and sugars until thoroughly combined (by hand or with use of electric mixer). Next, beat in egg, yolk, and vanilla until combined. Add dry ingredients and beat at low-speed just until combined. Stir in chocolate chips.
Roll a scant half-cup of dough into a ball. Holding dough ball in fingertips of both hands, pull apart into two equal halves. Place the formed dough balls onto the cookie sheet, with jagged surfaces facing up. Make sure to leave ample room between each ball, as the cookies will spread during baking. Bake, reversing position of cookie sheets halfway through baking, until cookies are light golden brown and outer edges start to harden yet centers are still soft and puffy (approximately 11-14 minutes).
Cool cookies on sheets until able to lift without breaking. Transfer to a wire rack to cool. Store in an airtight container.

Chewy Peanut Butter Cookies
3 cups all-purpose flour
1 cup sugar
1½ tsp. baking soda
1 tsp. baking powder
½ tsp. salt
¼ cup vegetable shortening
4 tbsp. unsalted butter, at room temperature
1 cup creamy peanut butter
1 cup honey
2 large eggs
Sugar, for rolling the cookies
Depending on size, this recipe will yield approximately 30 cookies
Adjust oven racks to upper and lower-middle positions. Preheat oven 350°. Line two cookie sheets with parchment paper.
In a medium mixing bowl, whisk together the dry ingredients (flour, sugar, baking soda, baking powder and salt) and set aside. In a separate bowl, cream together the shortening, butter, peanut butter and honey. Mix in the eggs one at a time, beating well after each addition. With the mixer on low speed, add the dry ingredients to the peanut butter mixture and beat just until incorporated.
Note: I used a hand mixer, but a stand mixer (with paddle attachment) would probably be more appropriate. I started to have some difficulty because the dough was so thick.
Roll the dough into 1½-inch balls, and roll each dough ball in sugar. Place the dough balls on the prepared cookie sheet, a couple inches apart. Bake for 10-12 minutes, or until slightly puffed and golden. Since I baked two sheets at a time, I reversed the position of each cookie sheet half way through the cooking time. Remove from the oven and let cool on the baking sheet for 5-10 minutes before transferring to a wire cooling rack to cool completely. Repeat with the remaining dough. Store in an airtight container.

Source: adapted from Annie's Eats (Chewy Peanut Butter Cookies and Thick & Chewy Chocolate Chip Cookies)
Sincerely,
Bailey
I decided to take advantage of my extended vacation from work and go "home" to visit my family. Now, I only live an hour away from my family, but it seems like I only make it back every few months. This is probably because my schedule is so busy! All I normally feel like doing on the weekends is relaxing at home.
Because it had been awhile since I'd been back to visit, I decided I'd bake some cookies to share once I got there. I had a very difficult time figuring out which cookies to make, so I settled on making peanut butter cookies AND chocolate chip cookies! They were a BIG hit! I'm so glad I left a few of each kind at my apartment! Between my family, my boyfriend's family, and a barbecue, almost 40 cookies were consumed!
So Friday evening I put in "Sex and the City (the movie)" and got to baking! It took me the entire length of the movie to bake all the cookies. It was a nice, relaxing evening!
Chocolate Chip Cookies
2 cups plus 2 tbsp. all-purpose flour
½ tsp. baking soda
½ tsp. salt
12 tbsp. unsalted butter, melted and cooled until warm
1 cup brown sugar, packed
½ cup granulated sugar
1 large egg plus 1 egg yolk
2 tsp. vanilla extract
1 ½ cups semi-sweet chocolate chips
Depending on size, this recipe will yield approximately 25 cookies
Adjust oven racks to upper and lower-middle positions. Preheat oven 325°. Line two cookie sheets with parchment paper.
In a medium mixing bowl, whisk together the dry ingredients (flour, baking soda, and salt) and set aside. In a separate bowl, mix together the butter and sugars until thoroughly combined (by hand or with use of electric mixer). Next, beat in egg, yolk, and vanilla until combined. Add dry ingredients and beat at low-speed just until combined. Stir in chocolate chips.
Roll a scant half-cup of dough into a ball. Holding dough ball in fingertips of both hands, pull apart into two equal halves. Place the formed dough balls onto the cookie sheet, with jagged surfaces facing up. Make sure to leave ample room between each ball, as the cookies will spread during baking. Bake, reversing position of cookie sheets halfway through baking, until cookies are light golden brown and outer edges start to harden yet centers are still soft and puffy (approximately 11-14 minutes).
Cool cookies on sheets until able to lift without breaking. Transfer to a wire rack to cool. Store in an airtight container.
Chewy Peanut Butter Cookies
3 cups all-purpose flour
1 cup sugar
1½ tsp. baking soda
1 tsp. baking powder
½ tsp. salt
¼ cup vegetable shortening
4 tbsp. unsalted butter, at room temperature
1 cup creamy peanut butter
1 cup honey
2 large eggs
Sugar, for rolling the cookies
Depending on size, this recipe will yield approximately 30 cookies
Adjust oven racks to upper and lower-middle positions. Preheat oven 350°. Line two cookie sheets with parchment paper.
In a medium mixing bowl, whisk together the dry ingredients (flour, sugar, baking soda, baking powder and salt) and set aside. In a separate bowl, cream together the shortening, butter, peanut butter and honey. Mix in the eggs one at a time, beating well after each addition. With the mixer on low speed, add the dry ingredients to the peanut butter mixture and beat just until incorporated.
Note: I used a hand mixer, but a stand mixer (with paddle attachment) would probably be more appropriate. I started to have some difficulty because the dough was so thick.
Roll the dough into 1½-inch balls, and roll each dough ball in sugar. Place the dough balls on the prepared cookie sheet, a couple inches apart. Bake for 10-12 minutes, or until slightly puffed and golden. Since I baked two sheets at a time, I reversed the position of each cookie sheet half way through the cooking time. Remove from the oven and let cool on the baking sheet for 5-10 minutes before transferring to a wire cooling rack to cool completely. Repeat with the remaining dough. Store in an airtight container.
Source: adapted from Annie's Eats (Chewy Peanut Butter Cookies and Thick & Chewy Chocolate Chip Cookies)
Sincerely,
Bailey
Wednesday, September 1, 2010
My First Paper Project
I began playing with the idea of scrapbooking early this summer. It all started when I stumbled across this wedding blog (Road to the Aisle). The writer, a woman named Heather, is a very crafty young lady! She totally inspired my creative side. Now, most of her posts are related to DIY projects for weddings (which, by the way, I plan to try when the time comes). But she also includes many "how-to" guides for making all sorts of neat paper crafts and other projects. So I decided, hey, maybe I can do this too. How gratifying would it be to create something by hand? And if only they could turn out as beautifully as some of her projects!
My mind was made up. I was going to jump right in to this! I had a friend who was expecting her first child any day, so I decided I'd make a card for her. I went to Michael's and bought the scrapbooking basics: a paper cutter, adhesives, paper, a craft knife and some decorations.
It took quite some time to get everything right. And let me tell you, cutting out tiny letters with a craft knife for the very first time was quite the awakening! It takes A LOT of patience and a steady hand. Although it looked a little sloppy, I was SO proud of myself. I consider my first attempt at paper crafting to be an overall success. It gave me further encouragement to continue with this whole paper crafts/scrapbooking thing!
Here's a picture of the card I made:
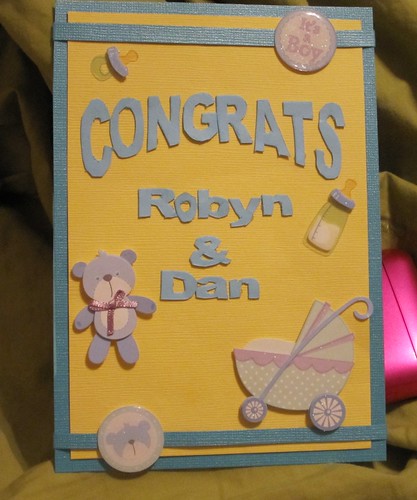
While I am getting better at using a craft knife, I am considering a future purchase of a Cricut or maybe a Silhouette. Having one of these would make lettering/shape cutting SO much easier. They're both pretty expensive though, so I want to make sure I'm in this for the long haul before I invest too much money. I'm leaning toward the Silhouette, mainly because it doesn't require cartridges like the Cricut. Therefore it is more of an upfront cost, rather than an on-going cost. If you have either of these, please give me some feedback!! I'd like to know which you prefer and why, and whether you think it's worth the price!
Sincerely,
Sincerely,
Bailey
My First Scrapbooking Classes
Well I officially signed up for my first scrapbooking classes. Since I am still pretty new to the scrapbooking world, I decided it would be helpful to learn some "tricks of the trade".
There's this little shop called The Scrapbook Page that I drive past every single day. I've noticed that the parking lot is almost always full and this caught my interest. So far I have been going to Michael's for my scrapbooking needs, but I'm thinking this may be my new go-to place for supplies. In fact, I think I might go check it out this weekend!
Once I take my classes, I'll let you know how it went. In the meantime, feel free to check out their website! They offer all kinds of supplies to buy online or in store, and offer tons of different classes ranging from scrapbook techniques, to photo techniques, to product demos. The classes I signed up for are about photo techniques. Also, from my brief phone interaction with the staff, they seem to have excellent customer service! I can't wait!
Sincerely,
Bailey
Monday, August 30, 2010
What's for Dinner? There's an App for that!
When you work the crazy hours that I do, or even if you don't, planning out your weekly meals in advance can save you a lot of time, effort, and most importantly STRESS! But let's be honest, planning out your meals for the whole week can be kind of tough. What if you think you'll be in the mood for sandwiches on Thursday night, but once Thursday rolls around, the LAST thing you want is a darn sandwich?
My advice? Stick to your meal plan. Each weekend sit down and plan out your meals for the upcoming week, then go buy your ingredients. Try to forecast the best you can. If you come to Thursday and the meal of the night isn't what you're in the mood for, you don't have to worry about wasting the ingredients you bought specifically for the sandwiches! Instead, turn to your Betty Crocker App on your iPhone! This app is AMAZING!
Not only does this app house hundreds of recipes, along with nutrition information, it also has a neat feature called "Meal Finder". The "Meal Finder" feature allows you to input up to two ingredients you have on hand, and select which meal you're making (breakfast, lunch, dinner, appetizers, desserts, etc).
This app came in handy for me over the weekend. I had bought ingredients for taquitos (will post recipe soon). Once the taquitos were done, I had several ingredients left over that needed to be used soon, otherwise they'd go bad. Well what in the world can you make with chicken broth and tomato juice? ASK BETTY! Using the "Meal Finder" feature, I input my ingredients, and selected "Any Meal". Betty gave me 4 potential recipes. The recipe I chose to make is a slow cooker recipe called Tomato Rotini Soup. Slow cooker recipes are fabulous for busy people. You can prep the ingredients the night before, throw everything into the slow cooker in the morning, and when you get home from work, viola', dinner is ready! See below for the recipe!
Now, for those of you without an iPhone (GASP!), The Betty Crocker website also has this feature. It is located on the main page of the website, and allows for 3 "on hand" ingredients, as opposed to the 2 allowed by the app. Both the app and the website provide a wealth of information, tips, recipes, nutritional information, and even coupons. I'd highly recommend one or both!
Slow Cooker Rotini Soup
4 cups vegetable or chicken broth
4 cups tomato juice
1 tbsp dried basil leaves
1 tsp salt
1/2 tsp dried oregano leaves
1/4 tsp pepper
2 medium carrots, sliced (1 cup)
2 medium stalks celery, chopped (1 cup)
1 medium onion, chopped (1/2 cup)
1 cup sliced mushrooms
2 cloves garlic, finely chopped
1 can (28 oz) diced tomatoes, undrained
1 1/2 cups uncooked Rotini pasta (4 1/2 oz)
Shredded Parmesan cheese, if desired
Mix all ingredients except pasta and cheese in 4- to 5-quart slow cooker.
Cover and cook on low heat setting 8 to 9 hours.
Stir in pasta. Increase heat setting to high. Cover and cook 15 to 20 minutes, or until pasta is tender. Sprinkle each serving with cheese.

ENJOY!!
Sincerely,
Bailey
My advice? Stick to your meal plan. Each weekend sit down and plan out your meals for the upcoming week, then go buy your ingredients. Try to forecast the best you can. If you come to Thursday and the meal of the night isn't what you're in the mood for, you don't have to worry about wasting the ingredients you bought specifically for the sandwiches! Instead, turn to your Betty Crocker App on your iPhone! This app is AMAZING!
Not only does this app house hundreds of recipes, along with nutrition information, it also has a neat feature called "Meal Finder". The "Meal Finder" feature allows you to input up to two ingredients you have on hand, and select which meal you're making (breakfast, lunch, dinner, appetizers, desserts, etc).
This app came in handy for me over the weekend. I had bought ingredients for taquitos (will post recipe soon). Once the taquitos were done, I had several ingredients left over that needed to be used soon, otherwise they'd go bad. Well what in the world can you make with chicken broth and tomato juice? ASK BETTY! Using the "Meal Finder" feature, I input my ingredients, and selected "Any Meal". Betty gave me 4 potential recipes. The recipe I chose to make is a slow cooker recipe called Tomato Rotini Soup. Slow cooker recipes are fabulous for busy people. You can prep the ingredients the night before, throw everything into the slow cooker in the morning, and when you get home from work, viola', dinner is ready! See below for the recipe!
Now, for those of you without an iPhone (GASP!), The Betty Crocker website also has this feature. It is located on the main page of the website, and allows for 3 "on hand" ingredients, as opposed to the 2 allowed by the app. Both the app and the website provide a wealth of information, tips, recipes, nutritional information, and even coupons. I'd highly recommend one or both!
Slow Cooker Rotini Soup
4 cups vegetable or chicken broth
4 cups tomato juice
1 tbsp dried basil leaves
1 tsp salt
1/2 tsp dried oregano leaves
1/4 tsp pepper
2 medium carrots, sliced (1 cup)
2 medium stalks celery, chopped (1 cup)
1 medium onion, chopped (1/2 cup)
1 cup sliced mushrooms
2 cloves garlic, finely chopped
1 can (28 oz) diced tomatoes, undrained
1 1/2 cups uncooked Rotini pasta (4 1/2 oz)
Shredded Parmesan cheese, if desired
Mix all ingredients except pasta and cheese in 4- to 5-quart slow cooker.
Cover and cook on low heat setting 8 to 9 hours.
Stir in pasta. Increase heat setting to high. Cover and cook 15 to 20 minutes, or until pasta is tender. Sprinkle each serving with cheese.
ENJOY!!
Sincerely,
Bailey
Sunday, August 29, 2010
Welcome!
Welcome to Inspired Delights!
Whew! It has taken 3 days, but I've finally gotten the design of my blog finished...and boy was that hard! I learned a lot of HTML lingo along the way though, so I guess that's a plus. I'm looking forward to sharing my "life" on here. Stay tuned for some juicy stuff!
For more information about who I am and why I created Inspired Delights, refer to the "About" page.
Sincerely,
Bailey
Subscribe to:
Posts (Atom)


