Friday, December 30, 2011

Spiced Nuts

These delicious nuts are always a big hit! I used to make the original recipe of just one pound, but it was never enough. Now I've gotten to the point that I always double the recipe so that I can give some away and still have plenty left over for me. The nuts are a wonderful combination of sweet/salty/spicy that most people cannot resist. They're quick and easy, which makes them a nice treat year round. I especially love to hand these out in my Christmas Goodie bags!


Spiced Nuts
2/3 cups brown sugar
1 1/3 cups white sugar
2 tsp kosher salt
2 tsp ground cinnamon
1/4-1/2 tsp cayenne pepper, depending on tastes (I've sometimes done 1/4 tsp paprika & 1/4 tsp cayenne)
2 pounds nuts (I like using almonds and pecan halves)
2 egg whites (at room temp)
2 tbsp water

Preheat the oven to 300 degrees. In a small bowl, combine the sugars and spices. Mix well and set aside. In a large bowl add your nuts. Like I mentioned above, I typically use a pound of almonds (about 3 cups) and a pound of pecans (about 4 cups), but you can use any kind of nuts you like. In a third bowl (I know - so many bowls!) combine the egg whites and water. Whisk the mixture until nice and foamy. I like to use my immersion blender with the whisk attachment to do this. (This multi-purpose tool is a MUST-HAVE for any home cook!!!) Once foamy, pour the egg whites over the nuts and stir around to make sure all the nuts are covered. Then pour the sugar and spice mixture over the nuts and stir it all together to make sure each of the nuts has a nice sugar and spice coating.

Spread the nuts evenly, and in a single layer, on 2 baking sheets lined with parchment paper. Cook for approximately 30 minutes, stirring and rotating half way through. Once they're done cooking, let them cool down a bit, then stir them around to make sure there aren't any big clumps.

You can eat them out of a Tupperware bowl like I do, or get fancy and put them in little mason jars with cute ribbons and give them away to friends. Your friends will love you for these, I promise!


Recipie Source: Adapted from Smitten Kitchen

Tuesday, November 22, 2011

Jamaican Honeymoon

We waited several months after our wedding before taking our honeymoon. Partially because we paid for the wedding ourselves and needed to save up some money and partially because we used a travel deal site and the best deal was for October.
Ryan and I on the plane ride to Jamaica -  Bright and Early
If you haven’t already used travel sites like Hotwire, Priceline, Orbitz, or any of the many, many others, I highly recommend you try. You can get enormous savings by booking through these sites. The travel package we chose was a 7 day 6 night stay at RIU in Jamaica. RIU is an all-inclusive resort chain with locations all over the Caribbean and Mexico. The price of the trip included the airfare, lodging and all taxes and fees. Excluding the airfare, it was about $150/day, which included all food, beverages and entertainment. Pretty great deal.
A shot of the courtyard
View from the stairway near our room
We had a 7am flight that connected in Atlanta. We only had about 15 minutes to spare between flights. It was nice that we didn’t have to wait around. I’m just thankful that nothing came up and it all worked out smoothly. We arrived in Montego Bay, Jamaica around 2pm and then had about an hour and a half drive to the resort in Ocho Rios, Jamaica. We ended up using a car service that our friends recommended. It was super convenient and I would definitely use them again. They were waiting for us at the airport holding a sign with our names. It was just Ryan and I in the shuttle which was really cool. They also picked us up on our last day and took us back to the airport. It really saved a lot of hassle and was well worth the fee. In case you’re interested, the tour company is called Karandas Tours.

Upon arrival to the resort we were greeted with drinks! It was very refreshing. The resort itself was HUGE. I think they said it was one of the largest in Jamaica. It was an open air type resort too, which was really neat.
Me in the lobby
Ryan checking out the courtyard
Most of our trip we spent lounging around on the beach, over-eating at the many buffets and restaurants and enjoying the nightly entertainment. The nightly entertainment was somewhat cheesy at times, but still, very entertaining. The entertainment/hospitality crew at RIU was amazing! They were all so talented and STRONG. They also did a really great job at keeping the audience captivated and into the show. Some of their performances included a dancing showcase where they performed various cultural dances from around the world, a production of Grease, another production called Africa, a variety game show, and a beach party. The final night we were there they had a steel drum band play and ended with a break-dance-off. It’s crazy to see people actually break dancing in person! I can’t believe they can do some of the things they were doing like standing on their heads or holding themselves up with just one arm.
Break Dancing at its finest!
Beach Party!
We also took a couple day trips while we were there. The first one we went on was called Reggae and Culture. This tour focused primarily on Bob Marley and the Reggae culture. We took a tour bus up the Nine Mile pass, which is a scary, dirt/gravel road. It’s a single lane that wraps its way up the mountain side. Upon reaching Nine Mile, we were led through the Marley compound. We got to see the house he was born in, where he was raised, and his mausoleum. After we left the compound, we traveled down the opposite side of the mountain, passing through all sorts of towns and villages. It really gave a vivid depiction of life in Jamaica. Obviously it is vastly different from Jamaica through the eyes of a resort. It was very interesting, though, to see this side of the country. If you ever have the opportunity to visit Jamaica, I highly recommend you take this tour. Even if you’re not a huge Bob Marley fan, I still think it’s worth the money.
Ryan and I at Mount Zion in the Bob Marley compound
Some of Marley's friends & relatives playing classic Marley tunes on the compound
Mountain that inspired Marley's "Natural Mystic"
The other trip we went on was somewhat a fluke. We were wandering through the resort one afternoon and a tour guide stopped us. He told us that his tour company (Chukka Caribbean Adventures) was planning a photo shoot for their brochures and said that if we were willing to be in the photos, they’d give us any tour we wanted for free. Well, we were a little hesitant at first, but they followed through on it. The next morning we received a phone call saying that due to the weather they had cancelled the photo shoot, but they were still going to honor the offer of a free tour. 
We chose to go on a river tubing/zip line combo. This was SO.MUCH.FUN! We first were driven about an hour away from our hotel, with a group of people from nearby resorts. I believe the town was called Saint Ann. I’m not positive though. They took us to the top of this mountain and put us all in tubes and sent us down the black river. It was pretty cool. Unlike everything else in Jamaica – HOT – this water was actually quite cool. It was a pretty peaceful float, with a few rapids along the way. There was also the largest bamboo I have ever seen growing along the banks. The tour guide told us that bamboo grows SIX INCHES A DAY! Crazy! The tubing portion of the trip took about an hour and a half, travelling around 3 miles down the mountain.  After tubing, we strapped into the zip line harness and went on 3 traverses. Let me tell you, I am horrible at zip lines. I lost my hand position on the first and longest traverse and basically spun in circles the whole way. It was a little scary. The other two traverses were much milder, and I had a better idea of what to do with my hands. Still, overall it was very fun. I would definitely do the tubing again, but the zip line may take some convincing. I wish I had pictures to show you, but I didn't want to risk breaking or losing my camera so I left it back at the hotel.

On the last day, I woke up to this under our balcony. Ryan had written "I love you Bails" in the sand down on the beach. He's so sweet :)
On our way back to the airport, our driver stopped off at a scenic view place and took a couple pictures of us. This bay is called "Discovery Bay" and according to our tour guide, this is where Christopher Columbus landed in the Caribbean! It was such a beautiful view. The picture just doesn't do it any justice!
Discovery Bay
Ryan and I overlooking Discovery Bay
We also saw this on the way back to the airport. I found it pretty funny that they have warnings on vehicles for drivers on the left side, since they all drive on the right side!
We didn't buy many souvenirs since we carried on our bags, but we did manage to bring back a ton of seashells, a nice conch shell and a small painting that we bought from a local painter who had a stand set up in the hotel one night.
Seashells picked from the Caribbean Sea by yours truly!
A conch shell that we bartered an old beach bum for with a couple Red Stripe beer!
Two people on a beach beneath intertwined palms
He signed the back for us. We bought it exactly 3 months after our wedding :)
If I had to sum up Jamaica in 3 words, they would be Beautiful, Impoverished, and Friendly. I would love to go back someday!

Wedding Recap

Well, this is pretty long overdue considering I’ve been married for just over 5 months now. Ryan and I got married on July 9, 2011. 
 
Our wedding was at lake in the middle of a botanical garden. We reserved the gazebo for the ceremony and an adjacent shelter house for the reception. From the pictures, the day looked absolutely beautiful. It was a bright sunny day with very few clouds in the sky. There was very little breeze to speak of, so no crazy hair in the photos. It was, however, quite warm. Okay, incredibly hot. But considering the oppressive heat wave that began the day following our wedding, one might say it was relatively cool. 


 As you can see, the temperature on my wedding day was 93 degrees. The remainder of July averaged 101 degrees, with 17 of the 22 days over 100 degrees. Did I mention the wedding was outdoors?

 Ryan and I, and the bridal party, did all of our pictures before the wedding, so we were all pretty hot by the time the wedding began. The pictures turned out great though! I will share the majority in a separate post. On the bright side, many of the pictures look like I’m “glowing” instead of sweating my rear off!
 We tried to keep our guests in mind when planned and set a ceremony time of 5:30pm, hoping that it would cool down somewhat. I’d say it was probably in the upper 80’s around that time so it was still very warm! Luckily I made paddle fan programs (tutorial coming soon!) to help keep them cool!
One of the program fans!

After the ceremony we headed to the shelter house for some cool relief. 

I’m SO glad there was air conditioning in there! I played it cool for a few moments over in the corner (while standing on an A/C vent). Before you say anything, you have to know – wedding dresses are hot, especially so in 90+ degree weather, especially when you’ve been outside for several hours! 

Just cooling off :)
After everyone filed in the building we began the dinner portion of the reception. We had Oklahoma Joe’s BBQ catered and boy was it fantastic. Ryan and I just love that place! I couldn’t have imagined better food! BBQ food isn’t your typical wedding fare, but it suited us perfectly.

Once everyone finished eating, it was time for the party to begin. A few of our good friends are in a bluegrass band called “That Damn Sasquatch” and they did us the honor of playing our reception. It was so much fun! Again, bluegrass is probably not typical wedding reception music, but hey, it was our wedding and that’s what we wanted. We had our first dance, Neil Young’s Harvest Moon, did the bouquet and garter toss, and then we all danced the night away. A couple of the guys in the band also played the ceremony music. There was an acoustic guitar and steel pedal to welcome me down the aisle. It sounded great and I wish I could have heard more of it.
The band playing on the deck outside the reception house, over-looking the lake
The grand finale of the night occurred at the end of the last song. Unbeknownst to me, several of our friends had brought over our stockpile of fireworks (we have friends in the fireworks business), took them down to a nearby dock and lit them all off. It was amazing! They couldn’t have timed it better either. The fireworks began just as the last song was ending. So perfectly choreographed! I wish someone had gotten pictures of it.

Well that about sums it up. I know there are many details that I’ve left out, but I didn’t want to go on too long about it. Inexpensive and fun weddings are very doable. We felt like our wedding suited us to a tee! Doing a wedding for less money does mean that you have to do a lot yourself. I’m so thankful that my Mother helped me every step of the way with planning, decorating, and anything else that came up. Plus, there were some very gracious relatives who helped get the reception area and ceremony area set up the day of the wedding. I don’t know what we would have done without all that help! 

The Bridal Party - Left to Right: Riley (my brother - who walked me down the aisle), Kelsi (my sister), Me, Ryan, Robert (Ryan's brother)


Stay tuned for some of our professional photos and a recap of our Jamaican Honeymoon!

Tuesday, October 25, 2011

New Job

I am very excited to announce that I have found a new job. This has me very hopeful that my happiness levels will increase. Don’t get me wrong, my previous job in public accounting gave me a lot of valuable opportunities and a broad range of experience. However, I am so thankful I was able to find a new job.

Today marks the beginning of my second week. I will keep my new job somewhat anonymous as I did with the previous on. However, I will highlight a couple of the perks that came with the new position. Coming from public accounting, my work/life balance was severely unbalanced, leaning heavily toward the work side of that equation. That being said, a major draw for this position was the 37 hour work week! I still have some flexibility with my schedule in that I can arrange those 37 hours over the week any way I want. Now every week I have a half day on Friday. That is so nice! I think I will really grasp this new schedule during the months that were previously consumed by my “busy season”.

Another major draw for me was the work itself. I am now working for a not-for-profit association. We help protect the public interest by supporting state insurance regulators. My responsibilities include quality reviews of insurance examination files, developing training programs for state examiners, and maintaining and updating the examination handbook. There are some similarities to my previous job. For instance, I still deal with financial examinations. In my new role, however, I will have much more of an oversight position rather than “work-horse” position.

Finally, the benefits really played into my decision in taking this position. The benefits package that’s provided by this company covers so much and at little cost to me. A really cool part of the package is the “Babies in the Workplace” program. This program basically allows mothers or fathers to bring their babies to work with them until the child is 6 months old. That will save a lot of money down the line, and will give me a few more weeks with my future babies before leaving them at a daycare!

What’s really interesting about my new position is that in college I wrote a thesis over internal controls best practices for not-for-profit organizations. This article was later published in Fraud Magazine. The content of my thesis included establishing best practices for maintaining reliable internal controls and preventing fraud in smaller companies where certain laws and regulations were not relevant or enforced, due to the size of the company. My new position is quite similar in that we provide oversight and best practices for insurance companies even though they are not technically required to follow our “rules”. They are simply policies and procedures to improve the company and protect consumers.

Anyway, that may not make much sense to people. I guess I still have a job that is difficult to explain to others! At least with this job I think I will get a lot more satisfaction out of it and be happier with the work I’m doing. I can actually see that my effort is making a difference and the work I do is good for the community. I’m very excited to see where this takes me!

Wednesday, September 21, 2011

Italian Pan Fried Chicken with Parmesan Roasted Green Beans

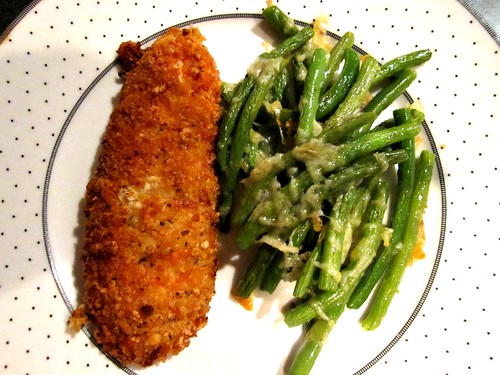
Tonight my husband and I tried out some of my latest Pinterest finds for dinner. On the menu for the evening was an Italian seasoned pan fried chicken breast with a side of roasted green beans topped with Parmesan cheese.


I was drawn to this combination for a couple reasons. First of all, we typically try to bake most things that are usually fried. We decided to be wild tonight and went with the pan fry. This method results in a crispier texture, with a little extra crispy boost from the panko. Also, by pan frying you get the crunch, but use much less oil than traditional frying. Best of both worlds!

For the beans, I thought it would be a nice change. I LOVE roasting vegetables, but have never actually roasted green beans before. Since the texture of fresh green beans is somewhat similar to asparagus, I decided to roast the beans exactly how I roast asparagus, just with a little shorter cooking time since the beans aren't quite as thick. This dinner was quick and easy. We love cooking together so that made things go a little quicker. I prepped the beans while he prepped the chicken. So with the team effort, this meal came together in about 20 minutes.

Now, I wasn't overly precise in measuring anything tonight. That's the beauty of cooking! Here is the list of ingredients I used and the approximate amounts. Feel free to get crazy though and use your own combo of spices and quantities!

Italian Pan Fried Chicken with Parmesan Roasted Green Beans
(Serves 2-4)

INGREDIENTS & DIRECTIONS

Italian Pan Fried Chicken Breast
2 boneless, skinless chicken breasts, each cut in half and pounded to approximately 1/4" thickness
Enough panko bread crumbs to coat the chicken (I ended up using about half a can)
Dash of salt and pepper
~ 1 tsp garlic powder
~ 2 tbsp dried basil
~ 1/2 tsp cayenne pepper
Handful of grated Parmesan cheese (optional)
Enough cooking oil to cook the chicken in

Place a large skillet on the stove with enough oil to cook the chicken in and turn the heat to medium high. While the oil is heating, prep the breading and chicken. You don't need so much oil that the chicken is submerged, just enough to cover the bottom of the pan. I used about 2-3 tbsp.

First we prepared the breading. You want this ready to go so you can just pound out the chicken, coat it with the breading and toss in the pan. We used a pie dish for the breading, but any shallow bowl big enough to hold the cutlets will do. In the pie dish we combined the panko bread crumbs, dried basil, garlic powder, cayenne pepper, salt and black pepper. I also threw in a handful of grated Parmesan cheese, for good measure. We gave the breading a good mix to combine and set it aside.

We then took grabbed our two chicken breasts. Like I said before, I didn't get very precise with measuring so I'm not sure exactly how much chicken I used (by weight); just two normal-sized, boneless, skinless, chicken breasts. We cut each breast in half. You would do this sort of like how you would if you were going to butterfly the breast, only instead of stopping when you're almost through, you go ahead and cut all the way. That way you end up with two thinner pieces. We did this to each of the chicken breasts, resulting in 4 cutlets. We then pounded out each cutlet until they were nice and thin, about 1/4" thickness. This helps the cutlets to cook quickly and evenly.

Once the cutlets have been pounded, dredge them in the breading, making sure to really press the breading on and transfer to the hot pan. We were able to fit two cutlets in the pan at a time. Try to fit as many in the as you can, just remember that you don't want them touching. Once in the pan DON'T TOUCH them for about three minutes. Just let them sizzle away. After three minutes, give them a flip and let the other side cook for about three more minutes. When these guys are done cooking, transfer them to a separate plate and get the others fried up. Depending on how hot your burner is, the cooking time may vary. As long as your chicken is cooked all the way through, you're good. You may want to cut one in half to make sure it's cooked in the middle.

Parmesan Roasted Green Beans
3/4 lb green beans
Dash of salt and pepper
~ 1 tsp garlic powder
Couple shakes of cayenne
Parmesan Cheese (however much you want!!!)
~ 1 tbsp oil

Preheat your oven to 400 degrees. You can get these going before the chicken, that way they finish at approximately the same time. Begin with prepping the beans. I usually chop of the tips of both ends, but I don't think you have to do that - really just need to chop the end with the stem. It's just habit of mine (who am I kidding - I'm a little OCD when it comes to uniformity of my veggies!). Once all the beans are chopped, give them a good rinse. I then transferred them to a medium sized bowl. I poured a little bit of oil and tossed to coat. Once the beans were coated evenly, I threw in all the seasonings. I used garlic, salt, pepper, and a little cayenne. You can pretty much use whatever you want though. Once again, I tossed to make sure the seasoning was evenly distributed. When everything appeared to be combined to my liking, I spread the beans out on a cooking sheet (I laid my silpat down first for easy clean up). At this point, I sprinkled the beans with the Parmesan cheese. However, I think in the future I'll let the beans cook up and then sprinkle with cheese during the last minute or two. This is personal preference.

When the oven is ready, slide the beans in and cook for about 10 minutes. After 10 minutes, my beans had softened, but were not incredibly soft - does that help at all? HAHA! If you want them a little mushier (yuck! I need some crisp left), cook for about 5 more minutes. If you decided you want to add the cheese at the end, I would add it when there is about 2 minutes of cooking time left. Now, because my oven sucks, I typically rotate whatever I'm cooking halfway through the process, just so everything cooks evenly. Know your oven people!


Kitchen Notes:
The recipe that I used as my inspiration indicated that 2 cutlets would equal a serving size. I'm not sure if my chicken was a big guy or what, but I think that one cutlet with the side dish was plenty. My husband ate two cutlets though. I'd say this meal would feed 2-4 people, depending on how hungry the crowd is and how big/small the chicken breasts are. We (and by "we" I mean "I") ate all the beans, but I love me some beans! Like I said, all in all this meal took about 20 minutes from start to finish. That's my kind of weeknight meal!! I hope you enjoy!

Inspired by: My favorite asparagus recipe and For the Love of Cooking for the beans and Bell'alimento for the chicken breast.


Tuesday, August 9, 2011

Pinterest - My New Addiction

Well, it's not like I needed another distraction in my life, but I've finally jumped on the Pinterest bandwagon. I must say, I absolutely love it! It now has a very important place in my morning/throughout the day/evening routine.

For those of you who are like me and have put off joining Pinterest or if you haven't heard about it yet, let me tell you why I love it.

What is Pinterest?
The easiest way to describe Pinterest is to say it's a fancy way to bookmark things you find on the Internet. Instead of adding links to your "Favorites" that you will probably never look at again, you can "pin" them to a board in your profile. Therefore, your favorites are now easily displayed in user defined categories.

How does it work?
Well, I'm all about visuals, and so is Pinterest. So here's an example:

Say I'm browsing for wall art on the Home Decorator's website and see a piece that I love.

Using the "Pin It" button I installed on my favorites bar (find out how to do this here), I am able to quickly pin things I see on the web to my Pinterest boards.

First, I click the "Pin It" button.


Then a box pops up with all the images on the page. I click on the image that I want to Pin


Next a box pops up that asks you to chose which board you want to pin the image to and a box for you to write a description of what you're pinning.


Once you click "Pin It", the image is added to the board you selected. The wall art that I liked from Home Decorators is now pinned to my "Home Decor" board.


Pinterest is definitely more fun once you get a solid number of Pins added to your profile and followers/people to follow. It's so great being able to see what everyone else is looking at and what they find interesting. I also love that my Pins are broken out into descriptive categories. If I stumble on a recipe I want to try, I can add it to my "Recipes to Try" board. If I see a cool looking craft project, I can add it to my "Crafts" board. I think you get the picture!

I'm still learning all the "ins and outs", so I may have a future update if I figure out something cool and exciting!

If you are not already on Pinterest and would like an invite, just leave a comment or send me a message and I'll get you one. If you ARE already on Pinterest, here's a direct link to my profile so you can check out my boards. I also added a "Follow Me" button to my side board if you choose later on to join in the fun! I'm always looking for new people to follow as well!

Happy Pinning!


Friday, August 5, 2011

Wyoming Vacation - Day 6 and Day 7

Well, we've just about reached the end of the vacation. These last two days were mostly spent with Ryan's family in Casper - that is, once we finally got there. Unfortunately I didn't get many pictures due to all the chaos, but we had a really great time.

After navigating through the crazy snow storm in Jackson, we got back down to lower ground and continued on the now six hour journey to Casper. Since our original route had changed due to weather, we were kind of "winging it" on our new, longer route. Since we were adding about 70 miles to our trip, Ryan reviewed the map to see if he could find a quicker way to go. He ended up locating some small highway on the map that appeared to follow closely with the mountain range rather than going down South and back up. We decided to go with it, not knowing what the road was going to be like ahead. I mean, it was on a map, so we assumed it was a legit road. We drove along a nicely paved road for about 10 miles before it turned to dirt. Yes, DIRT. On top of that, there had clearly been snow in the recent past, leaving many of the dirt roads very muddy. Did I mention we were in a Mazda 3? Not exactly the best vehicle for such driving conditions.

Anyway, with every turn we took it seemed like we were "almost to the road". We (and by 'we' I mean Ryan - haha) just knew that around the next curve we'd be on the main highway again. After about an hour and a half, our short cut dropped us off approximately 5 miles North of where we would have been, had we stayed on the main highway. That tends to be how short cuts go though, right? At least the weather cooperated.
This is the route Google Maps suggested we take

This is the Short Cut that we ended up taking
They look awfully similar huh!

Once back on the main road we noticed we were running low on gas. Unfortunately for us, the closest town, Jeffrey City, was about 30 miles away. When we finally got to this tiny ghost town, we went to the only building that looked like it had people in it. We found out that this town had no gas station. It was either continue on our route for 30 more miles or turn around and go 60 the way we came from. We obviously opted for the 30 mile route. When we reached the gas station, we experienced price gouging at it's best. Since it was the only option for many miles, they were charging an outrageous $4.10/gallon for regular, unleaded gas. Mind you, the rest of Wyoming was selling gas for around $3.20 during this time. So we got the minimum amount needed to get us to the next town, where we could fuel up for a more reasonable price.

We finally rolled into Casper around 5:30, just in time for dinner. We met up with Ryan's Aunt and Uncle, then went to pick up his Grandmother, and headed to the restaurant. Dinner was really good, but I was EXHAUSTED! I could not wait to get back to their house and go to bed. It had been a really long day of driving, and had started out very stressful because of the weather. Once we got back, we hit the sheets and we were out!

The next day started out pretty peaceful. We didn't have much planned since Ryan's Aunt & Uncle both had to work this day, so we decided to drive around town a little. We ventured up to the cemetery to visit his Grandfather's grave. Later that afternoon we went and visited his Grandmother and took her out for ice cream and drove up Casper Mountain. We tried to take some pictures up there, but it was really windy and only one turned out alright. We did get some more deer pictures though!

Ryan and his Grandmother on top of Casper Mountain
After we dropped Ryan's grandmother back off, we headed back to his Aunt & Uncle's house. We were notified that many of Ryan's cousins would be coming over that evening to hang out, so we were pretty excited! Ryan hadn't seen many of them for a year or so, and I had never met them. Some of the family had already arrived by we time we got there. There were so many little kids running around all over the place!!

Most of that evening was a blur. It just went by so fast! I so happy to meet everyone and to announce our engagement! After things settled down and everyone went home, we hit the sack again. We had a long day of driving ahead of us. The next morning we woke up to a fabulous home cooked breakfast of biscuits and gravy! The hospitality was so great. It was just what we needed to begin our trip back home.

The rest of the story gets very, very boring. It primarily consists of driving across Nebraska. The trip from Casper to Kansas City was about 14-15 hours, so we didn't get home until around 2 or 3am. I don't really recall - I was that tired! The only thing I really remember from the monotonous drive back is the way the humidity increased with every mile. There is such a HUGE difference between the humidity in Kansas and Wyoming. I didn't notice it as much going there, but on the way back it was extremely hard to ignore.

Well, that about sums it up! I hope I didn't leave anything major out! I probably should have written these recaps oh, about 3 months ago! But what's new?! I'm a little slow to update, obviously! So I hope you all enjoyed reading about my latest vacation!

Monday, July 25, 2011

Picture Troubles

To those of you who view my blog through a reader or via email, you might get notification of updates to prior posts. I changed some settings on my pictures on Flickr, and apparently, by doing that, I removed them from the blog. So the updates were just to correct that information. Sorry for any inconveniences!

Spaghetti with Meat Sauce

I know it may seem unnecessary to post a recipe for spaghetti with meat sauce. You're probably thinking, "Really? How hard could it be?" Well, I can definitely admit to searching and searching for the perfect homemade sauce. The stuff that comes in jars can be good,  but there is so much extra junk added in the mix that really doesn't need to be there. Also, the price. It can get pretty expensive to buy the quality sauces.

After numerous sauces and various experimentation, I've finally created a sauce that I am completely satisfied with. In my personal opinion, and Ryan's too, this is the best sauce EVER! Now I know everyone has different tastes, and some may already have a "best sauce EVER" that they would defend to the end. However, for those of you in search of an easy, flavorful, inexpensive sauce, this recipe is for you! Feel free to change things up too. The fun with cooking is the experimentation!


Ingredients:
1 lb ground beef (or chicken, turkey, etc.)
1 medium-large onion, diced
4 cloves garlic, minced
3 8oz cans of tomato sauce (or one large can - approx 24-28oz. Small ones just happened to be on sale)
1 6oz can of tomato paste (because I like my sauce a little thicker)
1 6.5oz can of mushrooms, diced (fresh would be awesome as well - I only had canned)
1 tsp dried basil*
1/2 tsp dried oregano*
1/2 tsp Italian seasoning
2 tsp salt
1-2 tbsp sugar (depending on personal tastes)
Black pepper to taste
Couple shakes of crushed red pepper (optional)


Instructions:
Begin with browning the meat. Once the meat is fully cooked, drain off any excess grease and return to pan. With the heat set to high, add the diced onions. Cook for a few minutes, until the onions begin to soften. Next throw in the minced garlic. When the mixture becomes fragrant, add in the other ingredients.

Stir in the tomato sauce, tomato paste, mushrooms**, and spice mixture. I personally like to combine all of my spices beforehand. This is just personal preference though. Bring the mixture to a low boil, then reduce the heat. At this point, the sauce is technically ready to serve. However, I like to let it simmer for awhile so everything can mesh together nicely. If you go that route, reduce the heat to a low simmer and cover, stirring occasionally. Depending on how hungry I am and how much time I have, I would let it simmer anywhere from 20 minutes to an hour.

Once the sauce is to your liking, grab a pile of spaghetti, add a generous serving of this meat sauce and a heaping handful of Parmesan cheese (that is, if you are a cheese fiend like me). If you want to get all fancy, you can top the dish with a couple leaves of basil. This treacherous Midwest heat did my basil plant in though, so no fanciness here.

To save time in the future, go ahead and make a double batch of the sauce and freeze it in an airtight container. Before freezing, make sure the sauce has cooled completely. Savour at a later date!!

*Remember - Dried herbs are more concentrated than fresh herbs. When substituting fresh for dried, you will need to increase the amount you are using.
** If you are using fresh mushrooms, add them to the mix with the onions

Recipe Source: My Imagination

Friday, July 22, 2011

Wyoming Vacation - Day 4 and Day 5

Hi Again!

Back for the Wyoming Vacation recap I see. Well, I pretty much covered the main events of Day 4! After the big proposal we went back to the hotel to regroup. Since it was so cold and snowy we weren't really sure what to do. So we decided that nothing sounded better than taking a blissful, newly engaged, afternoon nap. It was pretty great!

After the nap, we started our search for dinner. We love using Open Table. It's a free service that allows you to make restaurant reservations online (or with your phone). Every time you check in at your reservation you earn points. Sometimes there are promotions and you get a crazy amount of points, but it's typically 100 or so for most restaurants. The way I see it, I'm eating out whether I use Open Table or not. I might as well accumulate points. When you reach a certain balance of points you receive a gift certificate. Moving right along (see how easily I am distracted!)

We chose to eat at the Silver Dollar Grill in the Famous Wort Hotel. It came highly recommended by the hotel magazines! The food was really great, although I wish I had paid more attention when ordering. I chose the Salmon en Croute.... and yeah, I don't like breaded salmon so much. After I removed the "croute" it was delicious! Ryan ordered a super thick filet. I probably wouldn't eat there on a regular basis because it was pretty expensive, but it was nice for the occasion.

After dinner we walked around briefly in the town square. The antler entrance to the park was all lit up at night and looked pretty cool. However, it was freezing out, so we went back to the condo to hang out. It was a night of more roasted marshmallows in our fireplace.


 The next day we woke up to beautiful weather. I'd say it was around low 50's. Since it was so nice out, we decided to venture out to some of the nearby national parks. We knew for sure that Yellowstone was still closed, so we headed South toward the Grand Teton National Park


Unfortunately we didn't get to travel very far into the park. We were able to drive about 8 miles in before we had to turn around. Everything was still covered with snow, so the majority of views looked like this:
 
The entrance to the park looked promising!
 
 
The roads were clear, but the snow was piled higher than the car!

We really wanted to see Jenny Lake, but found out the roads leading there were still closed. However, we were pretty excited when was saw that the roads to Jackson Lake were open and went right along the banks. Unfortunately, this is what lakes look like in Wyoming during the month of April: 
 

It was still really pretty, but it would be nice to go back again sometime in the summer! After we left the park, we headed back to Jackson. Right on the edge of town is a wildlife refuge. Since it was on our way and free we decided to check it out. I think it's primarily for elk, but we saw lots of sheep, and even a grey wolf! The animals obviously didn't hang out close to the road, so they look really tiny in our pictures.

 
 (Sheep on the left and elk on the right)

Later that evening we went back to Snake River to get dinner. After that we just hung out back in the condo. Before we went to bed that night, it looked like this outside:
 

When we woke the next morning it looked like this:
Basically the same shot as the night before - just covered with a few feet of snow!!
The pile of snow on top of Ryan's car as we checked out of the hotel
We wiped the snow off the top of the car and began our trip to Casper. We had planned on leaving Jackson the same way we came. However, due to the snow overnight and the continued snow that morning, the road we came on was completely whited out. I used to think I knew what "white-out" conditions were, but after seeing Jackson white outs, I can for SURE say I know! I tried to take a picture, but anyone who's ever been in a white out knows everything is just bright white, so as you can guess, the pictures didn't turn out very well. Since we couldn't see anything at all, let alone where the road ended and fields began, we decided to turn around and find a new way out of town.

We went up the North side of the mountain, which ended up taking a little longer. On the way we stopped by Teton Village and snapped some photos and checked out the mansions. This is clearly where the rich and famous stay when they come to town! We tried to be as non-creepy as possible while gawking at the mansions, so I refrained from snapping photos of the huge houses. This is the only picture I took while in Teton Village:

The mountains in the background were sprinkled with amazing houses!
Back on the road to Casper! Final Wyoming Vacation post coming soon!